With Icecast servers you can set up authenticated listeners on your account. You may find this feature useful if you wanted to implement a listener subscription based model or perhaps just create a privately locked stream for a certain group of people only.
Listener authentication with the "htpasswd" method is a feature of Icecast that allows you to secure any particular stream mount point so that in order to listen the listener must first pass verification via the use of a username and password.
This guide explains how to set this up on your Icecast server.
Editing the 'Raw Configuration' file within Centovacast
You will first need to contact us here in order for us to give you the permission to edit your 'Raw Configuration' file within your servers control panel.
Once we have provided you with this permission you will then need to navigate to your control panels 'Configuration' settings and under the 'Stream' tab in the bottom right you will see the 'Raw Configuration' button. Click on this to enter the 'Configuration Editor'.

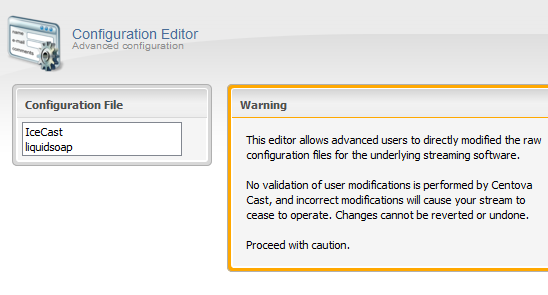
Within the 'Configuration Editor' page on the left you have a menu box to select either the 'Icecast' configuration file or the 'Liquid Soap' (AutoDJ) configuration file. You will need to select 'Icecast' from this menu to enter its 'Configuration Editor'.

In order to set up listener authentication you must configure a specific mount point. Below is the code that you will require in order to do this:
In the above code, on the line <mount-name>/live</mount-name> you will notice that in this case we have specified the /live mount point to be locked. You can change this to the default mount of /stream or just to the /autodj mount or whichever mount point it is that you wish to use authentication.
On the line <option name="allow_duplicate_users" value="0"/> you will see that we have this set to "0". When set to "0" this will prevent multiple connections from the same username. But if you change this to a value of "1" this will allow for multiple connections from the same username on that mount point.
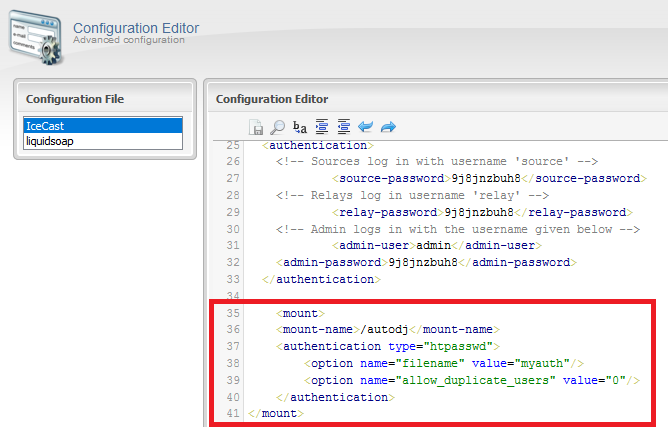
In the screenshot below you can see that we have inserted the code here on lines 35-41 of the Icecast configuration file.

Once you have inserted this code and specified the mount point to be locked you then need to save this from the 'Configuration Editor' options.
Setting up the listeners usernames and passwords
The next stage is to set up usernames and passwords for your listeners to give them access to tune into the stream. For this you will need to log into the 'Admin' area of your server. If you are not already familiar with doing this we have an FAQ on this here.
Once logged into your servers 'Admin' area, find the mount point that you wish to lock and from the options select 'Manage Authentication'. In this example we have chosen to lock the /autodj mount point.

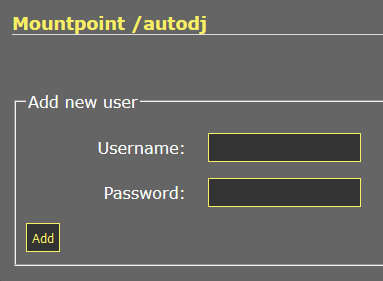
You are then taken to a page to create a username and password for the listener. Enter a unique 'Username' and 'Password' for each listener that you wish to provide access to the stream and then click on 'Add'.

Once this has been set for at least one user you will notice that on the 'Admin' homepage that the chosen mount point shows a padlock symbol and this is also where the listener will click to 'Login'.

Once they have entered their username and password on the 'Authorization Page' an M3U playlist file will pop up in their web browser for them to open in their own media player to begin listening to the stream.
So once this all set up all you then need to do is supply the authenticated listener with the servers index page URL (So for example: http://uk5.internet-radio.com:8012/) and then their own unique username and password.
Managing user authentication
Should you ever need to remove a listener you can delete their user account under the 'Manage Authentication' option of the mount point.

Listener authentication with the "htpasswd" method is a feature of Icecast that allows you to secure any particular stream mount point so that in order to listen the listener must first pass verification via the use of a username and password.
This guide explains how to set this up on your Icecast server.
Editing the 'Raw Configuration' file within Centovacast
You will first need to contact us here in order for us to give you the permission to edit your 'Raw Configuration' file within your servers control panel.
Once we have provided you with this permission you will then need to navigate to your control panels 'Configuration' settings and under the 'Stream' tab in the bottom right you will see the 'Raw Configuration' button. Click on this to enter the 'Configuration Editor'.
Within the 'Configuration Editor' page on the left you have a menu box to select either the 'Icecast' configuration file or the 'Liquid Soap' (AutoDJ) configuration file. You will need to select 'Icecast' from this menu to enter its 'Configuration Editor'.
In order to set up listener authentication you must configure a specific mount point. Below is the code that you will require in order to do this:
<mount>
<mount-name>/live</mount-name>
<authentication type="htpasswd">
<option name="filename" value="myauth"/>
<option name="allow_duplicate_users" value="0"/>
</authentication>
</mount>
In the above code, on the line <mount-name>/live</mount-name> you will notice that in this case we have specified the /live mount point to be locked. You can change this to the default mount of /stream or just to the /autodj mount or whichever mount point it is that you wish to use authentication.
On the line <option name="allow_duplicate_users" value="0"/> you will see that we have this set to "0". When set to "0" this will prevent multiple connections from the same username. But if you change this to a value of "1" this will allow for multiple connections from the same username on that mount point.
In the screenshot below you can see that we have inserted the code here on lines 35-41 of the Icecast configuration file.
Once you have inserted this code and specified the mount point to be locked you then need to save this from the 'Configuration Editor' options.
Setting up the listeners usernames and passwords
The next stage is to set up usernames and passwords for your listeners to give them access to tune into the stream. For this you will need to log into the 'Admin' area of your server. If you are not already familiar with doing this we have an FAQ on this here.
Once logged into your servers 'Admin' area, find the mount point that you wish to lock and from the options select 'Manage Authentication'. In this example we have chosen to lock the /autodj mount point.
You are then taken to a page to create a username and password for the listener. Enter a unique 'Username' and 'Password' for each listener that you wish to provide access to the stream and then click on 'Add'.
Once this has been set for at least one user you will notice that on the 'Admin' homepage that the chosen mount point shows a padlock symbol and this is also where the listener will click to 'Login'.
Once they have entered their username and password on the 'Authorization Page' an M3U playlist file will pop up in their web browser for them to open in their own media player to begin listening to the stream.
So once this all set up all you then need to do is supply the authenticated listener with the servers index page URL (So for example: http://uk5.internet-radio.com:8012/) and then their own unique username and password.
Managing user authentication
Should you ever need to remove a listener you can delete their user account under the 'Manage Authentication' option of the mount point.


